Tag: dell precision t5500
Using the Flex Bay in a Dell Precision T5500
by Jitesh Gandhi on Feb.06, 2010, under Computer Hardware, Technology
I wanted to add a hard drive to my PC for additional storage of media. I plan to mirror my primary drive and I don’t want to clutter it up with media. I want to use it only for applications and work. The Dell Precision T5500 in a mini-tower configuration has what Dell calls a flex bay. You can have an internal drive or an external drive in that bay.
I’ve had good luck with Dell service manuals in the past, but the one for the T5500 is of no real help when it comes to the drive bays, especially the flex bay. It took a little bit of figuring out, but I managed to get the hard drive installed, so I thought it might help others to explain how I did it.
Dell has good instructions in their service manual for the T5500 for some of the steps. I will also make use of some of their pictures as well. So here we go.
- Follow the service manual for removing the Cover (pulling the panel completely away makes it easy to lift out).
- Follow the service manual for removing the Front Bezel (this requires force and it helps to have someone hold the switch so you can hold the case and slide the bezel).
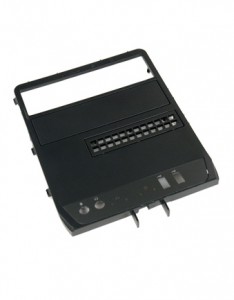
- Follow the service manual for removing the Drives Bezel.
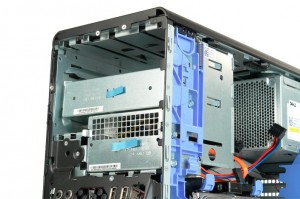
- My machine had only one optical drive, so there were metal covers over the second optical bay (5.25″) and the flex bay (3.5″). Pull on the “tab” (it’s the blue sticker attached to the metal covers in the picture above) to remove the metal cover. It’s in there pretty tight. My “tab” was not placed correctly and broke. If that happens, you can remove the one above it in the optical bay and then pull out the flex bay cover by getting your hand behind it. Worst case, both “tabs” break and you can remove the optical drive and then remove the two covers by hand. They all are set into grooves that act as rails for the screws.
- On the back of the drives bezel there are screws that you need to use on the hard drive. Remove the four at the bottom around the flex bay grill. Screw those into the the forward most holes on your hard drive (2 on each side) leaving the rear ones (closest to the power/data connectors) empty.
- Slide the hard drive into the flex bay grooves while holding down the sliding plate that locks the drives in place. If everything is done right, the hard drive will be locked into place and you can connect the power/data cables (it is helpful to disconnect the power cable from the optical drive to make it easier to connect the power cable to the hard drive, just be sure to reconnect the power cable to the optical drive). I bought a 0.4m (~16″) SATA cable which was way longer than needed. A 6″ cable would be long enough.
- Slide the metal cover(s) back into place to cover up the bay(s).
- Follow the service manual for replacing the Drives Bezel (the left side needs to be put in place first and the right side near the USB ports will not snap into anything, the front bezel will hold it down).
- Follow the service manual for replacing the Front Bezel (make sure everything is aligned and in their grooves before sliding it in place, if you don’t, remember that there is a release switch to remove it).
- Follow the service manual for replacing the Cover.
- Hook your PC back up and when you turn it on, hit F2 to enter setup and make sure that the SATA port that you connected the drive to is enabled.


 Facebook
 LinkedIn